By Lucas Gray | Gaffer & DP
In the modern recording era, the studio is no longer just a place to capture sound—it’s a visual stage. Whether you’re tracking a platinum record or filming a podcast for YouTube, recording studio lighting is the unsung hero that dictates the energy of the session and the professional “sheen” of your video content.

However, lighting a recording space is a high-wire act. You need to balance the psychology of creativity with the technical constraints of audio engineering. One wrong fixture can ruin a perfect take with a 60Hz hum or a whirring fan.
1. The Psychological Impact: Sculpting the Creative Flow
Lighting isn’t just about visibility; it’s about biological influence. The color temperature ($CCT$) of your studio can literally change how an artist performs.
| Lighting Style | Color Temp (Kelvin) | Psychological Effect | Best For… |
| Cool Daylight | $5000K – 6500K$ | Increases alertness, focus, and precision. | Mastering, technical mixing, or high-energy pop sessions. |
| Warm Tungsten | $2700K – 3200K$ | Promotes relaxation, vulnerability, and intimacy. | Vocal tracking, acoustic sessions, and jazz. |
| Dynamic RGB | Variable | Emotional immersion and brand identity. | Music videos, TikTok content, and “vibe” checks. |
Lucas’s Gaffer Tip: I always recommend a tunable CCT system. Starting a session at $5000K$ for setup and then fading to a warm $3000K$ for the actual performance signals to the artist’s brain that it’s time to “switch on” the creativity.
2. The Silent Enemy: How Lighting Affects Sound Quality
This is the part most “generic” lighting guides miss. In a recording studio, lighting is an audio concern.
The Noise Floor Problem
Traditional incandescent bulbs are silent but produce immense heat. Older fluorescents are a nightmare—they flicker on camera and produce a constant magnetic hum that gets into your signal chain.
The LED Solution
Modern recording studio lighting should rely almost exclusively on high-quality LEDs. But beware: cheap LEDs use low-frequency $PWM$ (Pulse Width Modulation) for dimming, which can cause electronic interference in your high-gain preamps.
- Requirement: Look for “Flicker-Free” and “Silent/Passive Cooling” fixtures.
- EMI Check: Keep your lighting power cables physically separated from your XLR and audio cables to prevent electromagnetic bleed.
3. Mastering the Setup: A Layered Approach
Don’t just hang one big light. To make a studio look “expensive” on camera, you need to layer your light sources.
I. Ambient Lighting (The Base)
This provides the general visibility. Avoid harsh overhead fluorescents. Use diffused LED panels (like the GVM SD200B) to bounce light off the ceiling for a soft, shadowless base.
II. Task Lighting (The Precision)
This is for the engineer and the artist. Use focused, dimmable lights for:
- The mixing console (ensuring no glare on the monitors).
- The music stand or lyrics iPad (ensuring no shadows on the sheet music).
III. Accent & Mood Lighting (The “Vibe”)
This is where you make the studio pop. Use LED Tube Lights placed vertically in corners or behind acoustic foam to create depth and separation from the background.
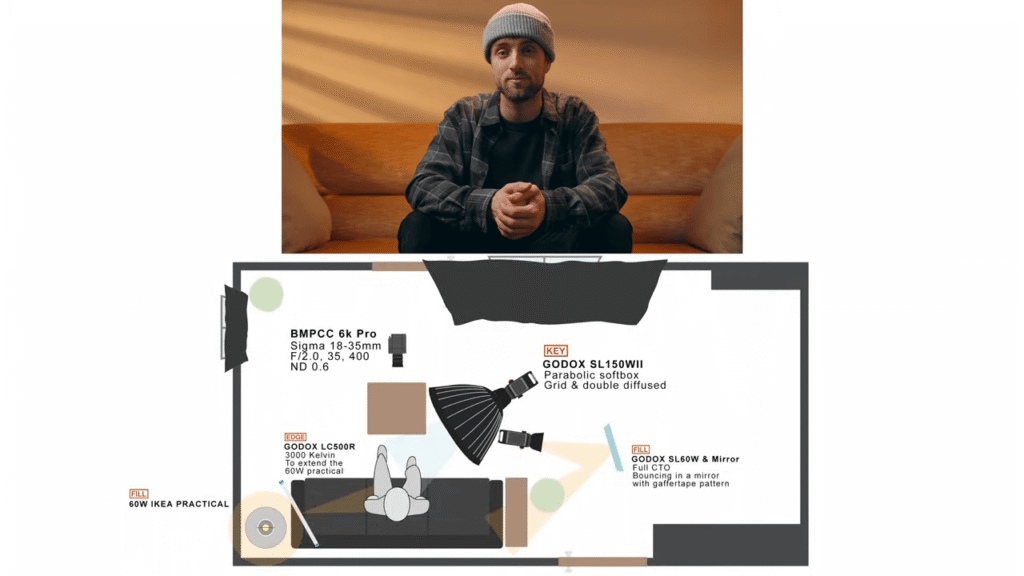
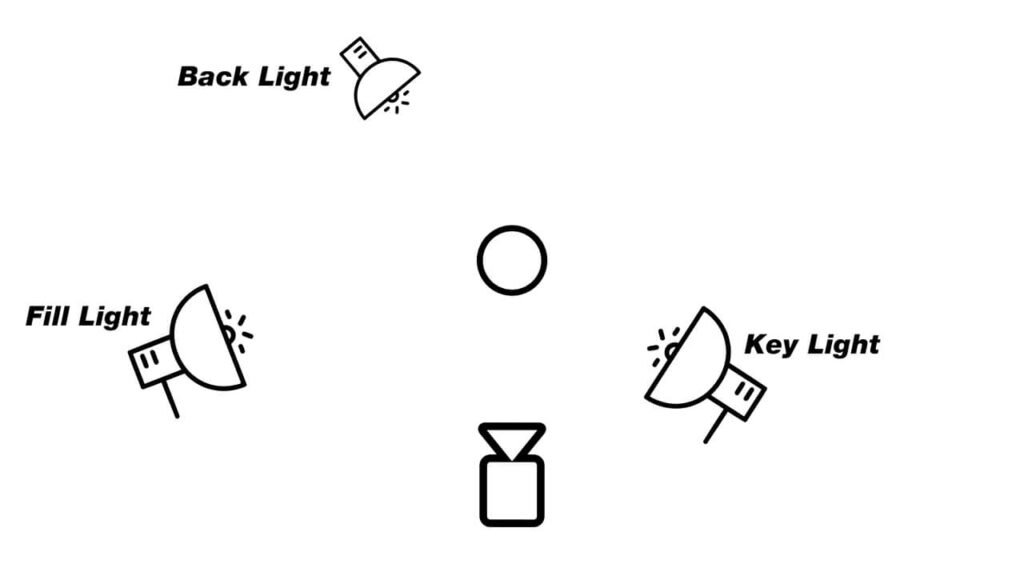
4. Visual Excellence: The 3-Point Studio Lighting Method
If you are filming your sessions, you must implement the 3-point studio lighting system. This prevents the artist from looking like a flat silhouette against the acoustic treatment.
- Key Light: Your main source, placed at 45 degrees to the artist.
- Fill Light: A softer source on the opposite side to gently lift shadows.
- Backlight (Rim Light): Placed behind the artist to “carve” them out from the background—crucial for studios with dark acoustic panels.
5. Safety and Infrastructure: Don’t Let it Smolder
A studio is full of expensive, flammable gear (acoustic foam, wooden instruments). Safety is paramount.
- Heat Management: LEDs are king here. If you use older incandescent lights, ensure they are at least 3 feet away from any acoustic treatment to prevent a fire hazard.
- Cable Management: Use gaffer tape (never duct tape!) to secure cables to the floor. In a dark studio, a loose cable is a lawsuit waiting to happen.
- Circuit Load: Don’t run your $1200W$ hair-light on the same power strip as your $10,000$ rack of vintage compressors.
Conclusion: Designing an Experience
Ultimately, recording studio lighting is about more than just technical specs—it’s about performance. As a gaffer, I’ve seen great lighting save a session where the artist was “just not feeling it.”
When you invest in a smart, silent, and color-accurate lighting system, you aren’t just buying lamps; you are building an environment where masterpiece records are born.