A lighting panel is one of the most versatile and widely used tools in modern photography and video production, valued for its soft, even output, simple setup, and broad compatibility with virtually every shooting scenario. Whether you’re building a home studio, equipping a YouTube setup, or expanding a professional production kit, understanding how lighting panels work — and which specifications actually matter — will save you money and dramatically improve your results. This guide covers everything from the fundamentals to the best lighting panel options available in 2026.
What Is a Lighting Panel?
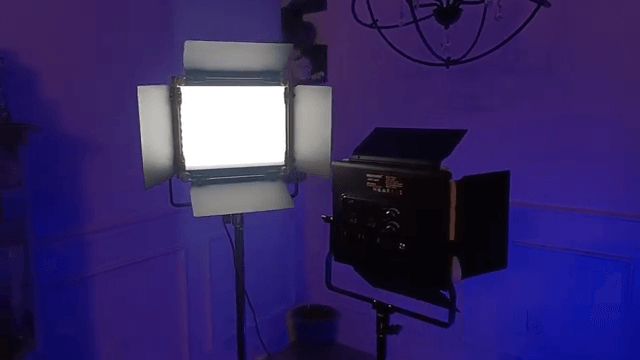
A lighting panel is a flat, rectangular LED fixture composed of dozens to hundreds of individual LED beads distributed evenly across a flat surface. Unlike a COB (Chip on Board) light, which concentrates output into a single point source, a lighting panel spreads its illumination across a broad area — producing naturally soft, diffused light without requiring a separate softbox or diffusion modifier.
This distributed light source design is what makes panels so practical for portrait, interview, and product photography. Because the light source itself is large relative to the subject, shadows are soft and gradual rather than sharp and defined — the same principle that makes window light so flattering. A panel light essentially behaves like a built-in softbox, which is why many panels are used bare, without any additional modifier, and still produce professional-looking results.
Modern lighting panels typically include several core features: bi-color or RGB LED arrays for colour temperature and creative colour control, stepless dimming for precise brightness adjustment, a high CRI rating (95 or above on professional models) for accurate colour reproduction, and app or Bluetooth control for remote adjustment. Most panels mount via a standard 1/4″ or 5/8″ stud, making them compatible with light stands, desk clamps, and camera rigs.
Lighting panels are used across an enormous range of applications: YouTube and podcast studios, product photography, live streaming setups, interview and corporate video, beauty and skincare content, and as fill or background lighting in larger multi-light productions.
Lighting Panel vs COB Light: Which Should You Choose?
This is the most common question photographers and videographers ask when building or expanding a lighting kit, and the honest answer is that the two technologies serve different — and often complementary — purposes.
Lighting panels excel at producing soft, even, flattering light without modifiers. Because the LED array is spread across a flat surface, the light wraps naturally around a subject’s face, reducing harsh shadows and producing the gentle, professional look associated with interview and beauty content. Panels are typically lighter, more affordable at equivalent output, and faster to set up than COB equivalents — there’s no modifier to attach, no parabolic structure to assemble.
COB lights concentrate their output into a small, intense point source. This makes them significantly more powerful per watt than panels at equivalent price points, and — critically — COB fixtures accept Bowens-mount modifiers: softboxes, beauty dishes, Fresnel lenses, grids, and parabolic reflectors. This modifier compatibility means a single COB light can be reshaped into dramatically different lighting qualities depending on the attachment used, whereas a panel’s light quality is largely fixed by its physical design.
The practical verdict: For beginners, YouTube creators, and anyone prioritising simplicity and immediate results, a quality lighting panel is the smarter first purchase — soft light straight out of the box with no modifier learning curve. For photographers and filmmakers who need maximum creative flexibility, higher raw output for larger sets, or compatibility with the full range of professional modifiers, a COB light is the better long-term investment.
Most experienced creators eventually own both: lighting panels for fill, background, and quick-setup interview positions, and one or two COB fixtures with modifiers for their primary key light role.
Best Lighting Panel for Photography: What Specifications Matter
Choosing the best lighting panel for photography comes down to evaluating four specifications that determine real-world usability and image quality.
CRI (Colour Rendering Index) is the single most important specification on any lighting panel. A CRI of 95 or above ensures skin tones, fabric colours, and product details are reproduced accurately, without the subtle colour casts that plague budget panels rated below CRI 90. For professional photography and any work intended for client delivery, CRI 97+ is the standard worth paying for — the difference is immediately visible in skin tone rendering and becomes increasingly important the closer the subject is to camera.
Bi-color range determines how flexibly a panel can match ambient light conditions. A wide range — roughly 2700K to 6500K — allows the panel to match everything from warm tungsten interior lighting to cool daylight, eliminating the colour cast problems that occur when mismatched light sources appear in the same frame. Panels limited to a single fixed colour temperature (daylight-only) are significantly less versatile for mixed-lighting environments.
Beam angle and output intensity together determine how usable a panel is at different working distances. A wide beam angle (around 120°) spreads light broadly, useful for illuminating larger areas or multiple subjects, but reduces intensity at distance. Check the lux output rating at 1 metre to understand whether a given panel will be bright enough for your typical shooting distance and aperture requirements.
Control flexibility — onboard knobs versus app and Bluetooth control — affects practical usability on set. App-controlled panels allow remote adjustment of brightness, colour temperature, and scene effects without walking to the fixture, which becomes increasingly valuable as you add more lights to a multi-panel setup. Panels supporting master-slave or mesh networking allow several units to be adjusted simultaneously from a single device — essential for solo creators managing multi-light setups alone.
Build quality and barndoors matter for anyone shooting professionally on a regular basis. Aluminum alloy construction outlasts plastic-bodied panels, and four-way barndoors allow precise control over where light spills, preventing unwanted illumination of backgrounds or adjacent areas.
Lighting Panel for Streaming & YouTube: Setup Recommendations
For live streamers and YouTube creators, a lighting panel is often the single most cost-effective production upgrade available — more impactful per dollar spent than camera or microphone upgrades for most channels in their early growth phase.
The ideal streaming and YouTube lighting panel setup prioritises three things: fast, repeatable setup since most creators are working solo without a dedicated lighting operator; bi-color flexibility to match whatever ambient light exists in a home office or bedroom studio; and app control so brightness and colour temperature can be adjusted from a desk chair without disrupting a stream or recording session.
A practical two-panel setup works for the overwhelming majority of streaming and YouTube content: one panel positioned at 45 degrees as the key light, and a second, lower-intensity panel on the opposite side as fill. This produces the soft, professional, shadow-controlled look that audiences associate with established, well-produced channels — without requiring a full three-point lighting kit or COB equipment.
For creators recording video alongside live audio — podcasts, interviews, voice-over content — panel lights have a meaningful advantage over high-output COB fixtures: their cooling fans typically run quieter at comparable output levels, since the heat generated per LED bead is lower when output is distributed across a larger array rather than concentrated into a single point source.
Scene effect presets — built into many modern panels — also add genuine production value for YouTube content specifically. Built-in TV flicker, lightning, and candlelight effects allow creators to add atmospheric variation to thumbnails, intros, and stylised segments without additional editing software or post-production work.
Cheap Lighting Panel Options: Where to Spend and Where to Save
A genuinely useful lighting panel does not require a large budget — but understanding where to spend and where to economise prevents wasted money on the wrong compromises.
Where to spend: CRI rating is never worth compromising on, even at the lowest budget tier. A panel with CRI 95+ at $50 will produce dramatically better, more usable colour than a CRI 80 panel at the same price — the colour accuracy difference is immediately visible and cannot be corrected without significant post-production effort. Bi-color capability is also worth prioritising over single-colour-temperature panels, since colour temperature mismatch is one of the most common and most visually damaging mistakes in home studio setups.
Where to save: App control, while convenient, is not essential for a single-panel beginner setup — onboard knob control is perfectly functional when you’re only managing one or two fixtures. Maximum brightness beyond your actual shooting distance requirements is also an area where budget can be saved; a panel rated for large studio output is unnecessary for a desk-distance YouTube or streaming setup.
Budget tier guide:
Entry level (under $60): Single bi-color LED panels with CRI 90+, fixed beam angle, onboard control only. Suitable for close-range YouTube, streaming, and casual content creation.
Mid range ($60–$150): Bi-color panels with CRI 95+, adjustable barndoors, app control, and often included softbox or diffusion accessories. The sweet spot for serious content creators and emerging photographers building a first proper kit.
Professional ($150–$300+): CRI 97+ panels with full RGB capability, scene effects, mesh networking for multi-light control, and aluminum alloy construction rated for daily professional use. Suitable for client-facing photography and video work where colour accuracy and reliability are non-negotiable.
A practical starting recommendation for most beginners: purchase one mid-range bi-color panel with CRI 95+ rather than two entry-level units. A single quality light, correctly positioned, consistently outperforms two budget lights regardless of how they’re arranged — and gives you a foundation worth building around as your kit grows.
Final Thoughts
A lighting panel remains one of the most practical and accessible entry points into professional-quality photography and video lighting. Its soft, even, modifier-free output makes it forgiving for beginners while remaining genuinely useful in professional kits as fill, background, and interview lighting. Prioritise CRI and bi-color range over raw wattage and feature count, start with one quality panel rather than several budget units, and expand your kit — toward COB fixtures and modifiers — only once you’ve mastered what a single well-positioned panel can already achieve. The fundamentals of light quality, direction, and colour temperature matter more than any individual product specification, and a good lighting panel is simply the most accessible way to start practicing them.